Owning a 3D file does not necessarily mean that it is printable. Professional 3D printers, like any other type of 3D printer, need a 3D file to create an object - and it is vital to verify that the file does not have any errors that would render it non-printable. To help you optimize your 3D files and CAD files for a print, Sculpteo has developed multiple algorithms that will automatically repair your file as soon as it is uploaded to the site. We are the only 3D printing company to offer these particular services for your rapid prototyping needs.
To be able to print a 3D file, there need to be several characteristics allowing the 3D printer to “read” the 3D file as a solid object or a set of solid objects. Once you have uploaded your 3D file onto your Sculpteo account, our tools allow you to ensure that your file can be 3D printed.
After loading your 3D file, Sculpteo provides two services:
- Analyzing your 3D file
- Repairs for your 3D printing
- Analyze your 3D file:
The analysis of your 3d file is intended to provide an exhaustive list of reasons for the non-printability of your 3D file. Afterward, we offer an automatic, semi-automatic, or manual solution to fix it.
When loading a 3D file, our tool automatically scans your 3D file to determine:
- All of its structural features, format, and size. This tool accepts over 20 different file formats.
- The nature of your content: is it a single object or a set of objects? In the latter case, our tool offers to select the print option of your 3D file as a single object or as a set of separate objects.
- Repairs on your 3D file:
Once your 3D file is transferred and analyzed, our system automatically generates a repaired version of your 3D file if it is not directly 3D printable. If you want to keep complete control over the repair of your 3D files, you can manually choose other repairs options. You can also make simple diagnostics to know where to modify your 3D file in your 3D modeling software.
Repair your 3D file using Sculpteo repair tools
When a printable file is uploaded to our site, it is automatically analyzed and corrected by our repair algorithms. There are few problems that our algorithms are not able to repair. That being said, our reparations may drastically alter your model, depending on the severity of your file's errors. However, when a file is repaired, we also offer different algorithmic reparations, giving you a choice of how your file will be repaired.
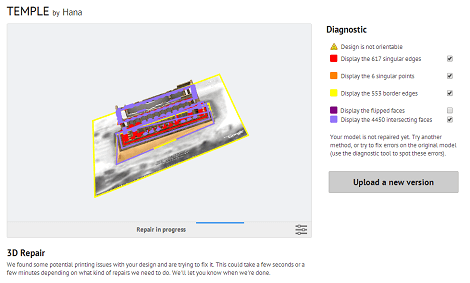
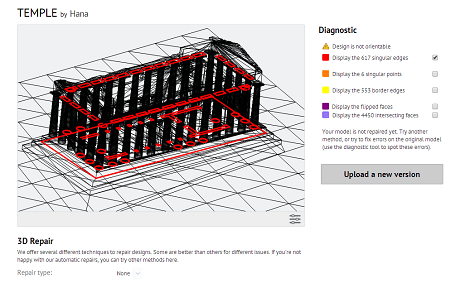
Diagnose your 3D file
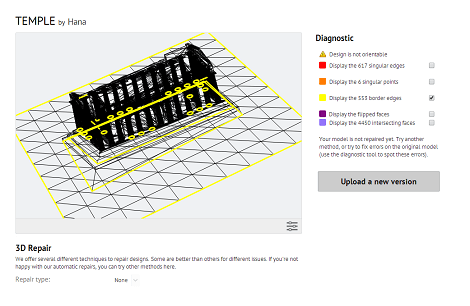
You can access the 3D file diagnostics in the top right portion of your screen. The diagnostic will point out the errors in your 3D file and show you exactly where those problems arise in the 3D viewer. The file then updates according to the repair options you choose. Choosing "None" in the drop-down menu will show your original file, and you will be able to visualize each of the errors detected by our software.
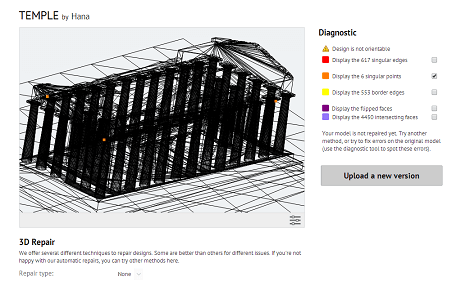
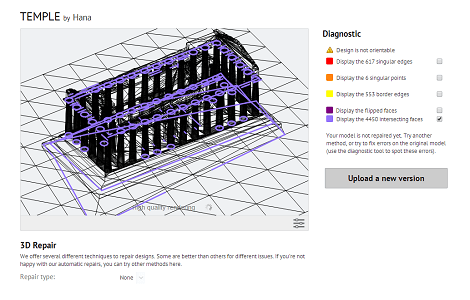
The diagnostic check will show the following errors. To know more, you can check our paragraph explaining how to correct a 3D file manually for 3D printing.
- Edge Stops (surfaces that do not contribute to the border of a volume)
- Singular Edges
- Singular sides and points (non-manifold)
- Intersecting Faces (auto-intersections)
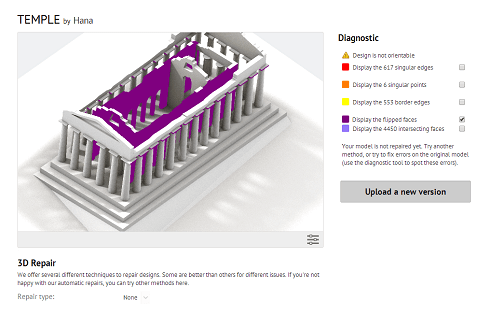
- Inverted Faces (orientation)
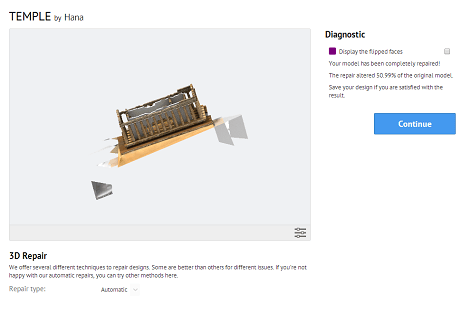
Repair your 3D file
If our auto repair function alters your 3D file significantly or does not result in a fully corrected version, you will be redirected to our repair page. If you are not satisfied with the repairs, you can change your 3D file and upload it again or try other correction methods directly on our website. To do this, simply select one of the remedies proposed in this drop below the 3D viewer menu and choose the one that suits you best. Once the repair is decided, you can click "Continue.”
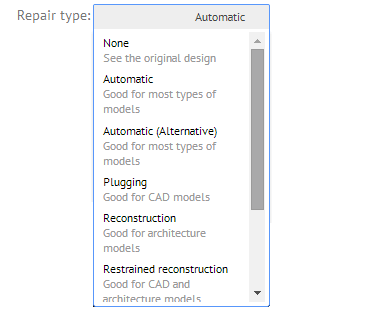
We offer the following repair functions:
- Automatic: Optimized for most file types
- Plugging: Good for CAD models
- Reconstruction: Good for architecture models
- Restrained reconstruction: Good for CAD and architecture models
- Visible reconstruction: Good for miniatures or small non-mechanical objects
- Hybrid Reconstruction: Good for models made of multiple parts
Correct your 3D file manually
Verify the structure of a 3D File
When you transfer your 3D file on our site, some geometric inconsistencies may prevent our printers from understanding it. The most common problem we run into is that your file does not consist of a single, solid, and uniform object. Our printer is then unable to determine the interior and exterior of the model and render the file 'Not Orientable.’
Most 3D modeling programs available today are not explicitly created for 3D printing; they often include animation and visual rendering tools. Animation and graphic renderings do not require solid/closed objects to render (the priority is placed on the model's surface). However, a file destined for a 3D print requires more than a simple surface - a 3D print requires volume. Our online repair tools (which will launch automatically if a corrupted file is uploaded) can fix most of the problems within a file. Still, to maintain complete control over your model's conception, it's important to understand how to repair your file manually.
Conceive a closed 3D model with voluminous surfaces
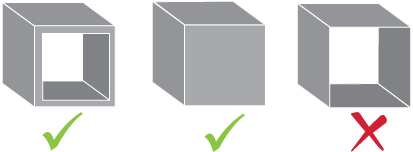
To ensure that your 3D model is closed or "watertight,” you must verify that the model's geometry does not contain surfaces that do not bound a volume. To reiterate: a surface without a thickness or does not contribute to a volume cannot be 3D printed. This problem can be corrected by either deleting the object or giving the surface(s) volume.
In other cases, there may be small holes that prevent the volume from being "watertight.” Most 3D modeling programs have a 'Fill' tool that can quickly remedy the problem.
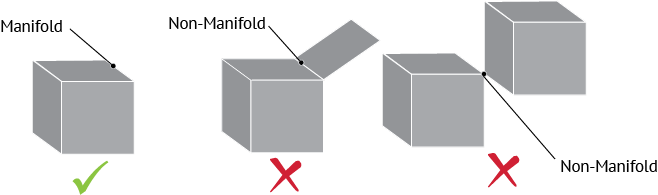
Correct non-manifold edges and singular points
During the conception of your 3D file, certain operations may create unattached, ambiguous surfaces which do not connect. Other operations may separate surfaces, creating a singular point of connection. These singularities prevent our online tools from determining the volume of the model.
To define a clear volume, each side must be connecting two and only two adjacent faces. Similarly, singular points must arrive at the collection of multiple faces. If two faces share only one point (as shown in the image below), the model is considered "non-manifold" and will not be able to be printed.
These singularities can be eliminated by disconnecting the non-manifold surface and giving it volume or deleting it completely.
Delete auto-intersections
As you create your 3D model, there may be a point when two or more volumes cut into each other. These intersections create an ambiguous model with uninterpretable volumes. 3D Modeling Softwares often have a function that can merge these elements, rendering a singular object - for specifics in a particular program, see our tutorials on modeling a 3D printable file.

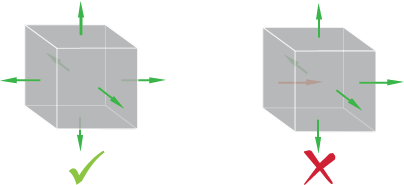
Correctly orient your model's surfaces
In most 3D modeling software, surfaces are oriented with an inside and an outside to help determine the model's volume. If one of the faces of an object is oriented in the wrong direction, its volume may be indeterminable by our online software. It is important to reassure that each face is oriented in the correct direction to avoid that type of problem.
Check that your object is physically feasible
When you design a file for 3D printing, you must also read and follow the design guidelines of the material you're planning to print with, and our 3D printed polyamide is our most common option. Each material has its restrictions when creating a file. For example, your plastic 3D prints must have a minimum thickness of 0.8 to 1 mm, depending on the particularities of the design. It is also important to note that, unlike your 3D file, your print will be a physical object and constrained by our universe’s known physics. You must check and ensure that your 3D file can support the weight of its cantilevers and that the object's walls are thick enough to support themselves.
Check the format and size of your 3D file
To upload your 3D file to our online 3D printing service, you ought to double-check that it is not too large and exported in one of the 25 file formats our programs can interpret. For more information on accepted file types and exporting a file, visit our page on exporting a file for 3D printing.