What are the advantages to hollowing your 3D printed part? If you already ordered a part through our online 3D printing service, you might have noticed that we put some great features for you to optimize your 3D printing process. These features are here to help you get the best 3D printing experience possible. Indeed, thanks to these 3D printing tools, you can repair your model, reduce weight, reduce your 3D printing price in just a few clicks.
Today we are going to focus on the hollowing tool. A lot of our customers are using it to optimize their parts. Let’s see why you should try it and how to use it well and avoid all the possible mistakes. Get ready to hollow your 3D part now!
Why should you start using the hollowing tool?
What is hollowing?
Hollowing removes the inner material of a part, leaving a shell. Hollowing is a straightforward process that can be applied to all objects created using powder-based technology. If you plan to create your 3D printed object using Selective Laser Sintering, Multi Jet Fusion, or Colorjet, you should start to consider hollowing.
How does it work?
We have built an algorithm that allows you to hollow your part with just one click. It analyzes the geometry of the object and determines where the excess powder can be removed. Once the 3D printed part is out of the 3D printer, it goes through some post-processing by our specialized technicians. The procedure that it goes under is called sandblasting. With the sandblasting tool, the technician blasts air and powder (sand) inside the holes to remove the excess powder.
What are the advantages of hollowing for you?
There are many advantages when it comes to hollowing your 3D-printed parts. Indeed, this process is an excellent way to save material. How does the reduction of the amount of material used affect you? Less material means an apparent reduction of the 3D printing price of your part. It is also an excellent way to get a lightweight part! Reducing the weight of your part can be a significant advantage for your project, and obviously, hollowing is an effortless way to make your 3D parts lighter.
Moreover, as a hollowed model consists of less material, less heat is generated during the printing process. This is also an essential benefit of hollowing, as less heat leads to a more stable process and reduces the potential risk of deformations in the printed objects.
Are you ready to make the most of this feature? To ensure an excellent 3D printing experience, you will need to respect a few rules.
How to hollow your part to get the best result
Using online tools or 3D modeling software
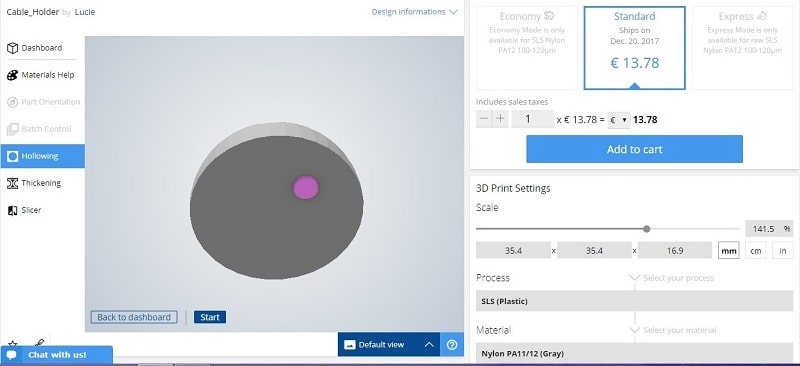
You have two options. As we just told you, our online 3D printing service offers the hollowing feature, and you can upload your model and directly place the holes where you want. It is a speedy and straightforward way to do it. You just have to select “hollowing” and click where to put the holes on your 3D model.
By using our tool, you can not only remove the unnecessary material out of your 3D printed part, but you also significantly reduce the price of your 3D print. Our 3D printing service allows you to get an instant quote, and you can immediately see the difference.
But you can also use the 3D design software of your choice to hollow your 3D models manually. Each 3D modeling software includes several hollowing tools that are specifically meant for this purpose. A simple way to use these tools to hollow out your model is to select one of its surfaces and extrude it inwards.
This will scale down your 3D model and create a void on its inside. In other words, the exterior of the 3D model will not change while the interior is hollowed. In some instances, getting a hollowed model can give you more freedom during the design process.
How many holes and what size should they be?
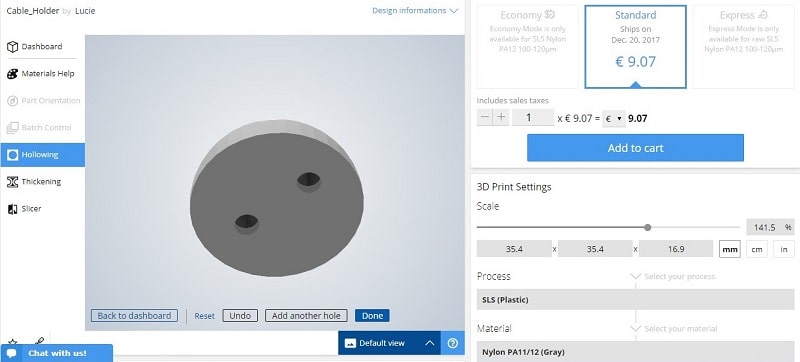
To hollow your part correctly, you need to put a minimum of two holes on your 3D model. To remove the excess powder trapped inside your part during the cleaning process, you can’t forget these holes.
If you are using Sculpteo’s hollowing tool, you will automatically be prompted to add these holes and directly select where they should appear. If you are hollowing your part manually, you must ensure that the holes are at least 5mm in diameter, and there needs to be a minimum of 2 holes. If you upload a 3D model already hollowed on our website, please check the diameter of the holes.
Indeed, if holes aren’t large enough, our technicians can’t remove the excess powder. Parts that can’t have the excess of powder removed will be refused. That is why it is essential to check if the diameter of the holes you placed on your part is the right size.
Where should you place the holes on your parts?
If you want your 3D printed part to be perfectly hollowed, you must put the holes in the right place. Otherwise, you will receive a part with holes on it, but only partially hollowed.
The position of the holes will depend on the shape of the object, but it will also depend on the use of this object. If it is a decorative object or a visible object, holes cannot be placed on a surface that affects its aesthetic.
A tip that applies to most cases is to place the holes on surfaces that will not be visible, such as at the bottom of the 3D models. Placing two holes one next to each other is pointless; the powder will not be removed correctly. There should be quite some distance between the two (or more) holes, letting the powder circulate inside the part. Preferably, place your holes near edges or zones far from each other; at least, there should be one hole on one flat surface and the other hole on the opposite side.

Be careful: All 3D models cannot be hollowed!
Indeed, you can’t hollow all 3D models. If your objects are too thin or too small, they cannot be hollowed. This happens for two reasons. First, because there isn’t enough material, the part. Thus, there is almost no chance of excess material that needs to be drained out.
Moreover, as usually thin objects are fragile, adding a hole to their surface can make them even more vulnerable to the point of breaking. And this brings us to an important point: Wall thickness.
Think about the wall thickness while hollowing your parts
We always remind you about this rule, but if you want to avoid all 3D printing problems, checking the design guidelines of the material you are using for your project is the most important thing. Several 3D printing materials have different wall thicknesses, so make sure to check them before ordering your part. Indeed, when hollowing, as your 3D printed object will be empty, it can affect the strength of your object, especially if the 3D model is already fragile.
Don’t worry; it doesn’t mean that you can’t hollow your part! One of the solutions can be to thicken your 3D model. Our online 3D printing service also offers this feature. It will thicken your part automatically if you need to. This way, you reduce the risks of getting a broken part.
If you don’t want to thicken your part there is another solution for you: You can work on the internal structure of your part, and add lattices. This specific structure will help strengthen your 3D-printed object. Indeed, this specific design feature forms a network of crosshatch sections that strengthen the whole structure. Allowing for a hollowed part that is lighter but with an internal structure, you can get a good and strong 3D printed part.
Going further: Other 3D printing features offered by Sculpteo
Now that you know all about our hollowing feature and how to perfectly use it, you should check out our other online tools.
We also offer tools such as Batch Control and Customized Orientation, which help the users of Sculpteo’s online 3D printing service have the best customer experience and achieve the best 3D printing result.
If you still have questions about the hollowing tool or any other tools offered on our website, don’t hesitate to contact our sales team. They will answer all your questions and give you the best 3D printing tips!