To use our laser cutting and engraving service online, you will primarily need a vector file. A vector file is a file that contains all the information necessary for our laser cutters to produce your object. On this page, you will learn how to get a 2D file and verify that it is usable, the accepted file formats and how to export your 2D file before transferring it on our website. You'll also find information about the features we offer once your file transfers.
The information is available in the following categories:
- First steps to laser cut or engrave an object - You will learn how to get a 2D file and what things to check before transferring it on our site.
- Export your file for laser cutting and engraving - You will find a summary of all the 2D formats and file sizes allowed on our website, design restrictions, and how to export your files in the right format.
- Upload your vector file - You will learn how to transfer your file to our website and find a summary of features offered by Scultpeo once your file has been transferred.
How to get a vector file
To use our online laser cutting and engraving service online, you need a vector file. Simple pictures or drawings are not enough to create your object because they do not contain the information necessary to enable our machines to cut or engrave it. But then, how do you find a file for cutting or engraving? Here are several options available to you:
- Create your vector file: to learn more about what modeling software to use, you can refer to the paragraph below to create a file for cutting or laser engraving.
- Ask a designer to create a vector file for you.
- Use free vector files on sites such as Noun Project.
Create a vector file for laser cutting and engraving
There are several ways to create a vector file. You can use a wide range of software, either for modeling or design, professional or not, priced or free, more or less complete, and easy to use. Whatever software you use, you should not forget the design guidelines that must be respected. You will find examples of software that you can use. Of course, these are only suggestions, and you can use the software of your choice as long as you export your file in the correct format. You can read our article on the ' Top 8 Software for Laser Cutting.
|
Professional CAD software |
Software for 2D design |
Free CAD software |
|
|
Check that your vector file meets the design restrictions
Before uploading a vector file, you must check that it does not contain any design error.
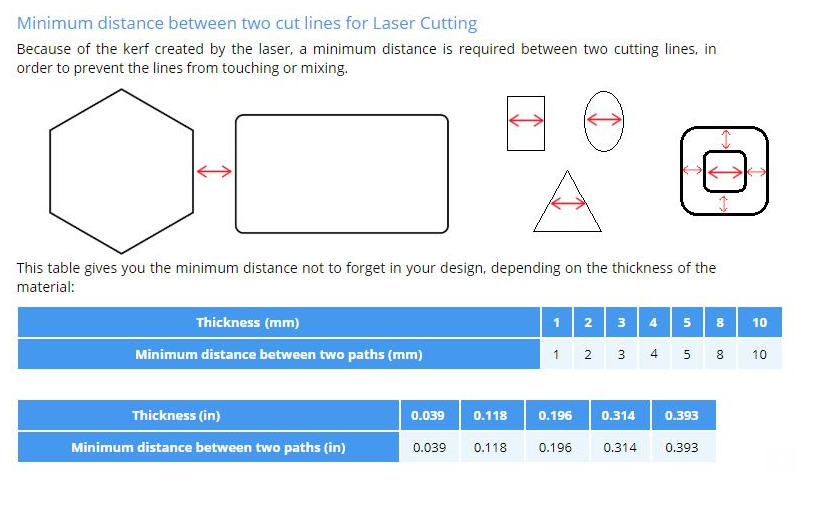
Furthermore, you should follow the design guidelines of the material you want to use, which you can find at the end of each material page. Each material has specific constraints which are necessary to take into account. For example, you must consider the kerf that the laser creates as it passes over the material and check that the size of the object does not exceed the size of the cutting table of our machines.
Once your file is ready, you can export it in SVG, and you should be able to upload your 2D file on our website!
Accepted file formats
To upload your file on our site, you must export it to a suitable file format. We highly recommend the SVG format. Other possible formats are DXF, AI, EPS, PDF.
Export your vector file
Most software can export directly into SVG. When this is not the case, you can use 2D design software like Illustrator or Inskape, which generally can transform a DXF file into SVG.
Upload your vector file on our website
When you are ready to upload your vector file, you can go to the Upload page. From there, you can select a file from your computer or Drag and Drop a vector file. You can even choose the visibility of your upload. Public files will be visible to any visitor and can be ordered by anyone. Private files are not searchable and only visible to those with a link. While you are waiting for the upload to complete, you can name your design, add a description, select a category, add tags, change the visibility, allow people to customize the model, and choose who can access your file with the link to be able to purchase the model or not. Once uploaded, our algorithms will analyze and automatically repair your 2D file if some errors remain.
Laser Cut and Engraving Settings
The price will be displayed on the right of your screen, and it will be updated in real-time automatically depending on modifications you bring to it.
Furthermore, it is always good to ensure that your model is the proper size before exporting in any file format. After uploading your file, our website could think that your model is in inches or millimeters when your model should be in centimeters! It is because some file formats do not contain unit information. Whichever measurement unit you need your model, ensure that the proper measurement unit is attached to your model in the Laser Cut Settings.
The Drop-down menus 'Material' and 'Thickness' are also adjustable in the 'Materials' tab.
Configuration of your vector files
Sculpteo’s tools offer you to use different ‘Styles,’ depending on your wish to engrave or cut your vectorial paths and fills. Each style has a unique color code. By default, our algorithm detects the colors you defined for your paths and suggests corresponding styles. If you haven’t defined colors for your file, you can do it once it is uploaded to our website.
You can assign an outline and fill for each style. The style will be applied to all the vectorial paths and fills selected for the style.
- The outline matches the vector path selection. You can choose to cut or engrave your path.
- The fill matches the surface selection of the inner or outer vector path. You can choose to engrave your surface.
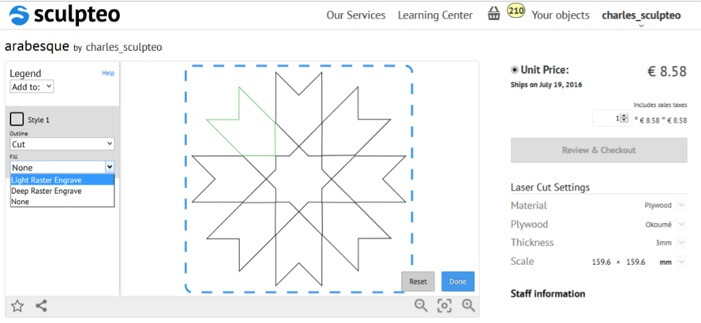
For the outline and the fill, you can choose different engraving types:
- Line engraving: it is the same operation as laser cutting, with lower power. One level of depth for line engraving is available on our website.
- Surface engraving. We offer two levels of depth: light and deep. The light surface engraving is barely perceptible to the touch compared to the deep surface engraving ( the depth cannot be confirmed for either of the engraving options as the depth can vary depending on the thickness of the sheet ordered).
You can refer to our design guidelines on our material pages to ensure your files are correctly built and ready to be laser cut or engraved.
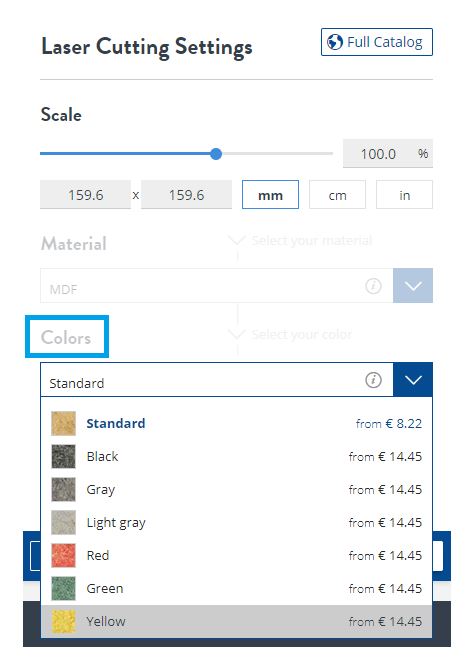
Material choice
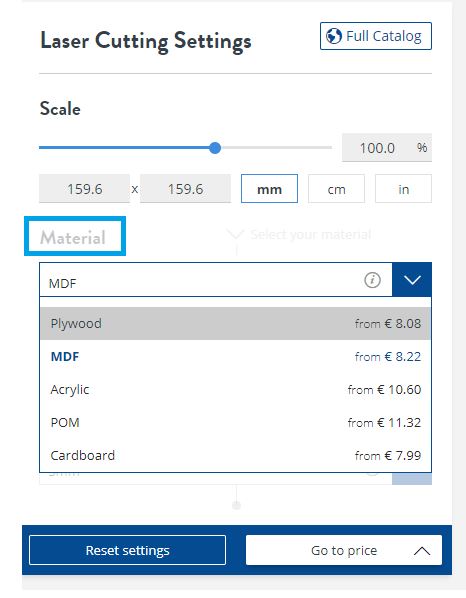
Underneath the price & size of your project, you have the option for the materials, colors, and thickness.
In our 'Material' menu, you can select the required material depending on the catalog that you choose.
There is then an option that allows you to select the color when applicable for the chosen material:
There is then an option to select the thickness available for the chosen material:
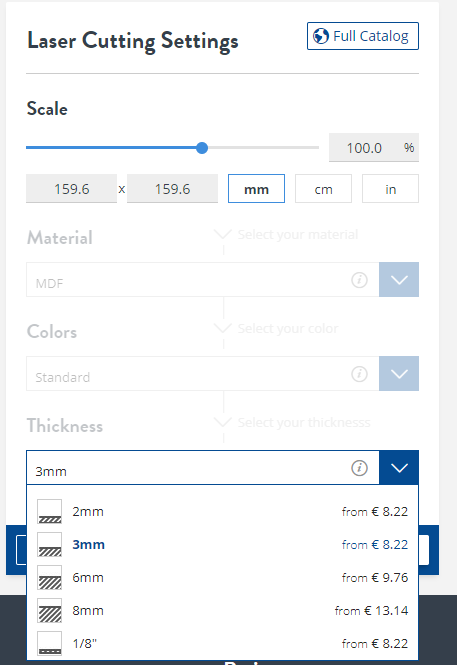
You will find definitions, uses, and specifications of our materials here.
Verification
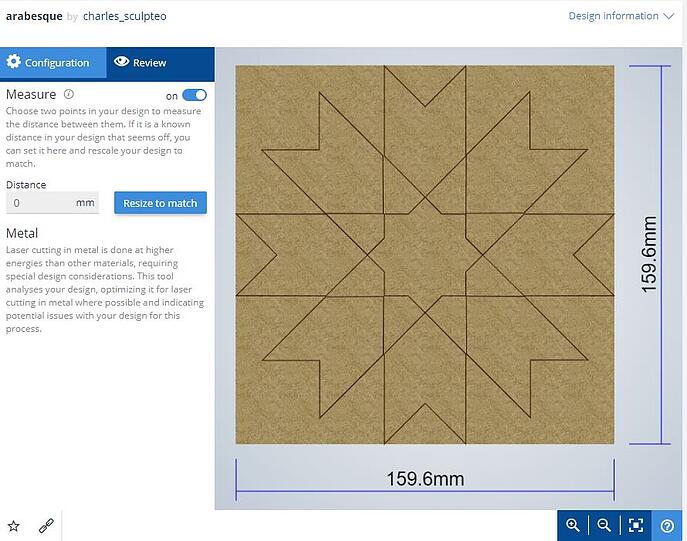
When using the "Review" Tab, you can use the cursor and the left click of the mouse at a certain point and then click a second time to obtain the measurements between the 2 points.
Please keep in mind that we recommend a 1 to 1 ratio:
If the cutting lines are close together with the POM material, a slight deformation of the sheet could occur. It is due to the way the sheet heats up with the energy from the laser when it is cutting this material, and the POM material is resistant to heat end; therefore, it needs a stronger laser beam; when it cools, the deformation can occur then. To avoid this, we recommend that you use Acrylic material instead.